Showing posts with label Michaels. Show all posts

Sunday, July 28, 2013

Midnight Party 1/3 : Oh Look, An Art Project.

Introduction

So I've mentioned Midnight Party a few times now in recent posts. This game was very much a kid's game (supports ages 4 and up) from 1989. It was designed by Wolfgang Kramer, who years later would create several games of greater popularity (like El Grande, The Princes of Florence, Torres, Colosseum, Category 5, and his Mask Trilogy of games).
The box (above) and rules were destroyed by water. You can
see some of the damage on the upper part of the box.
I remembered liking Midnight Party fondly as a kid, probably because of the wonderful theme and simple rules behind the game. The ghost in the game (Hugo) has a birthday party, and all the players control guests playing hide and seek with him for 3 rounds. When Hugo comes out from the cellar everybody needs to find a room to hide in for points. Those captured by Hugo receive penalty points.
Early sketch, just playing around. [Instagram]
While I don't think this game holds up 100% over time (it's a fairly random game), I like a few aspects of it. The pieces are well made, and for its time the board projected the theme very well. Additionally, I like that it works for 2-8 players, which is a rarity in a lot of board games.

The pieces that were still good were:

  • Hugo the Ghost
  • Ghost die (d6 with 1, 2, 4, 5 and 2 Ghost faces replacing the 3 and 6)
  • 30 Guests
    • 6 Blue and Red (for a 2+ player game)
    • 5 Turquoise (for a 3+ player game)
    • 4 Yellow (for a 4+ player game)
    • 3 Black (for a 5+ player game)
    • 2 Purple, Green, White (for a 6-8 player game)

Design

The only thing I really need to rework is the game board. The problem is that I really want this to be as visually captivating of a game as I can make it. In order to do this I started taking one approach, and then started along a secondary one. Neither are finished yet, but I think enough process has been hashed out to at least start talking about these designs. I plan to complete both designs in the future.
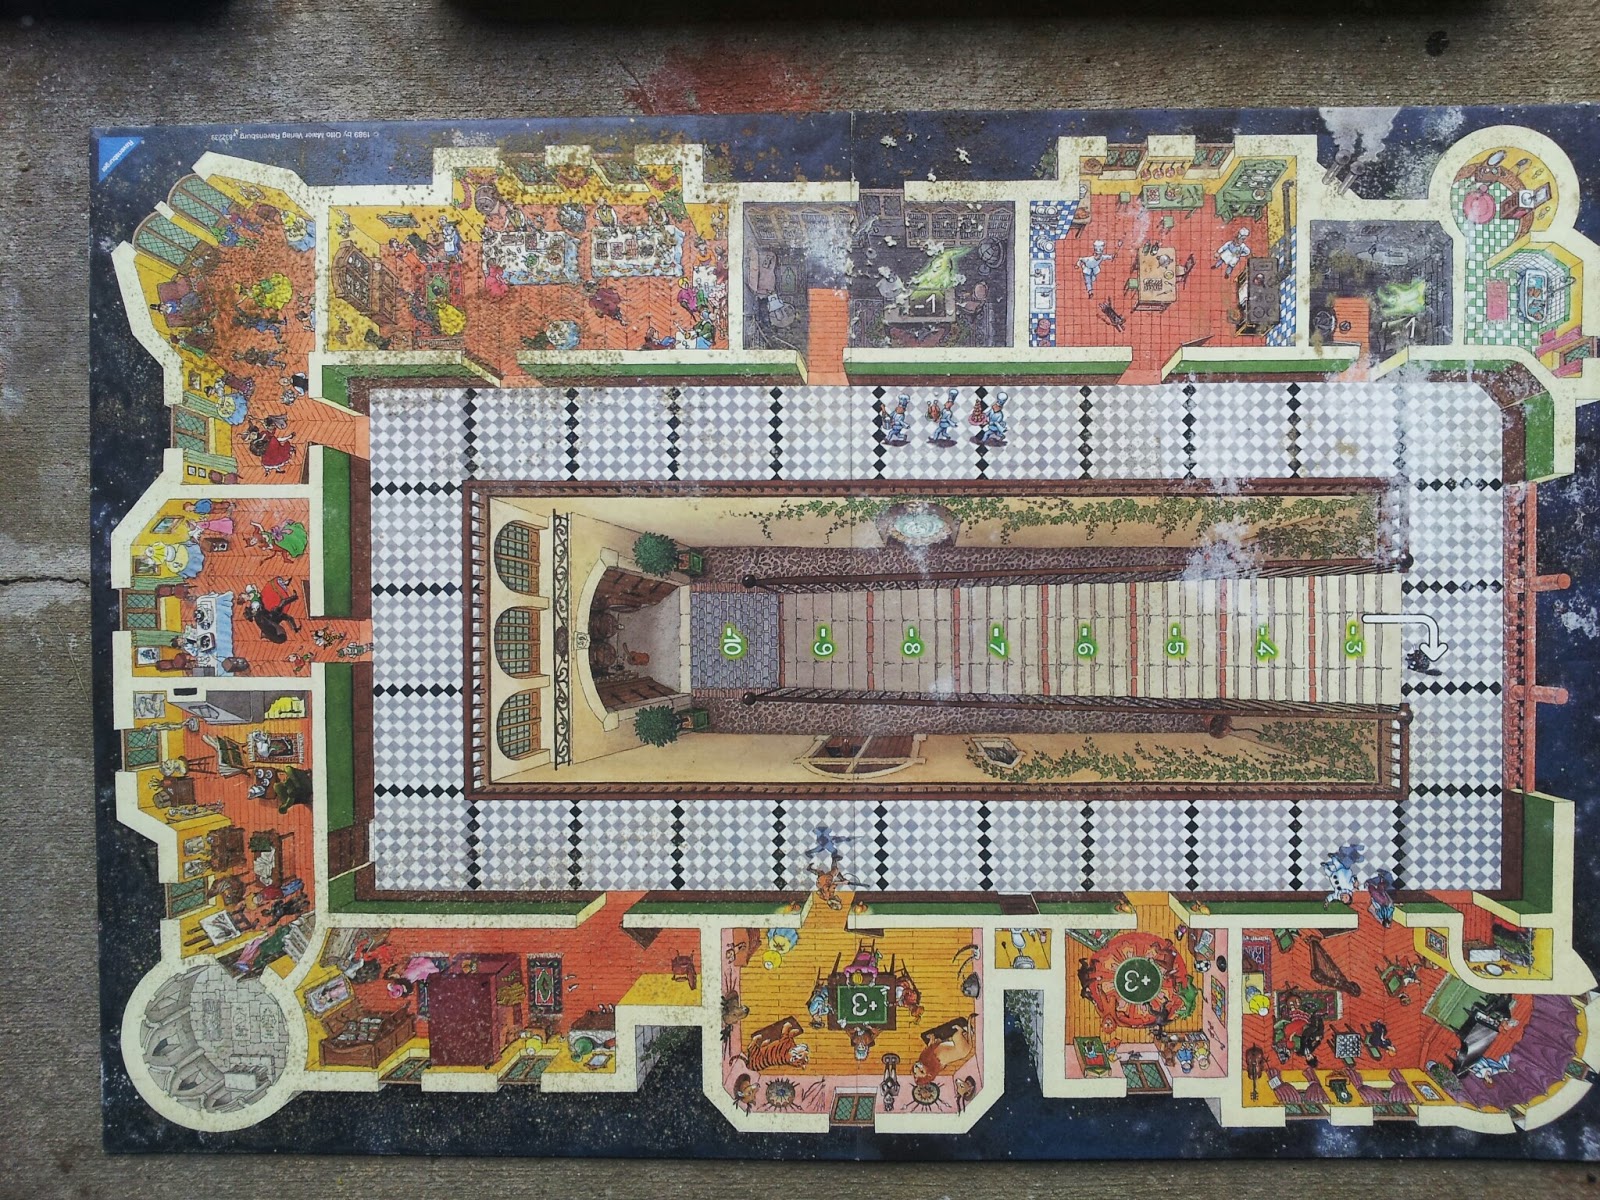
I took general and detailed pictures of the board to
try and capture as much detail as possible.
(The upper left part was in pretty bad shape though)
Initially I wanted to make a basic paper replication of the game, so I could have a quintessential board to work off of like I did for Pipeline. Nothing really amazing with that - paper and Rapidograph pen as usual.
Game board with some measurements and added notes.
Some board/box sketches.
above: assembled, below: separated.
As I was looking at it though, I recalled how I always wished the cellar on the board was more like an actual cellar - with some depth and character built in. Given this thought, I set to work on making a box for this quartered board, so when opened, the room panels could lay across the box and the inside act as the cellar.

I sketched out some ideas on how to accomplish this kind of presentation and eventually came up with the idea on the right. Pretty much the idea is to try and have a shallow box for pieces to keep the cellar from being so steep that pieces can't stay on the tilt.

I got some wood and additional components from Home Depot and then went to Michael's for some Acrylic paint to paint the boards with. I figured since this painting part would probably take the most time, I should start looking into getting a heads start on it. I chose acrylic paint because I knew it would provide bold colors and dry quickly, but it had also been at least a decade since I cracked open acrylic paint.

Revelation

I was looking at some canvases to practice painting with acrylics on and then it hit me: For some games, I could paint the boards on canvas and store them as such. It was a fascinating idea - the board as art and the pieces stored behind the canvas. I'm sure some of the inspiration came from getting CO2 recently (the watercolor look is beautifully striking), but I think a majority of the idea game from Solarquest. Up until this point I was considering learning how to make my own [typical] game board (this still may occur), but the idea of working tirelessly on painting a board that would just get stored in a box seemed a little demoralizing.

I picked up a 10"x20" canvas and got started on another game board for Midnight Party testing this idea out (I used Midnight Party because its board is both smaller and more difficult than the Solarquest board - pretty sure I can paint planets). Here are the results after each round of painting so far:

Round 1 (Basic layout)
Round 2 (Early text and detail)

While not yet complete, I think these can kinda show how I'm thinking this could work. Furthermore I think if I can add something that would allow pieces/rules to be stored behind the canvas (without much increase in weight), this may be a really neat way to present games to people. "Hey, you want to play chess? Here, let me pull it off the wall for you."

Game pieces on canvas. See an unnecessary autoawesomed
version of this at the bottom of this, courtesy of Google+ .
In the end, I think it's a really neat idea for board games - and for art. Art for me has really escalated more and more toward pretentiousness and elitism in a way that saddens me. I personally don't think that brand of art has much higher to climb though; my two most recent New York trips had MoMA highlighting artists that were either reviewed in their own Ivory Towers, or "Gimmicky Diversions". I've come to appreciate more of the less pretentious art over the years, and I feel the more sincere pieces can hold up better in time and appreciation. In my lifetime I'd love to see an artist with the passion of Van Gogh over the extravagance of Dali for instance.

Conclusion

So initially I had one board idea and game out with two. My intention at this point is to complete the canvas version in the near future and look at a Solarquest board next (unless something else catches my eye more). On the side, I'm hoping to construct my initial box and board design, although I know there's more construction involved in this one.

Bonus: Unnecessary Autoawesome

Google+ has an effect called "Autoawesome" that gets applied to a sequence of similar pictures taken over a short timeframe. While I find them distracting to the post, it's kinda fun to see what they do. So here you go.

I guess it's a good way to see that these pieces do, in fact,
have three dimensions.
It was hypnotic enough that I felt the need to add it in.

Wednesday, July 17, 2013

Dominion Storage Solutions, Version 2

Introduction

A little while ago I mimicked a Dominion storage solution I found on a website, cutting a few corners to reduce cost (if you missed it, it's here). I first wanted to mention a few minor changes I made to the initial design (found here) and then talk about a second design that consolidates cards better and is a more portable solution than what I started with.

Version 1.0 adjustments

Version 1 mainly constituted of a couple acrylic card boxes.
I made a couple additional changes as I noticed some little annoyances when using my initial model. Neither change was that drastic, but I've found they're nice little adjustments to have made.

The first problem I had was the lid not closing if the tabs were vertically upright. To fix this, I trimmed each tab about 1/8" from the bottom (or halfway to the index card's next blue guide line). It was a little time consuming, but it worked out well. The tabs still stuck out and were readable; I guess I didn't need as much clearance with the tabs as I initially thought.

Tab sliced, above a tab that wasn't sliced.
The bottom part is the difference between the index cards.
The second problem I had was when tabs fell over in the acrylic case - sometimes it was a little tricky to pick them up, especially when they shifted under other cards and tabs. My brother made a great suggestion of slicing a coffee stirrer vertically with a razor blade and putting one on either side of the card to act as a little bumper. If you cut a standard coffee stirrer into quarters, you're able to add bumpers to 2 index cards per stirrer.
Tab after adjustments.
You can get stirrers in bulk at a store like Staples. If you want to test out the idea I found my local Qdoba had some on hand.

Version 2.0

Although I liked my initial solution, I wasn't particularly thrilled with it for portability. I currently own Dominion (base game), Intrigue, Hinterlands and Guilds and it was 3 card boxes to carry everywhere. On the one hand it was nice that I could pick and choose what to take (since I'm introducing people to Dominion still I don't usually need to take anything beyond the base set and Intrigue with me), but that's still 2 card boxes to take and I can do better.

Additionally I had carry games in recyclable tote bags, and those card cases are a little larger than those standard sized bags. I've been noticing my bags starting to have holes wearing through them, and it looks like it's due to those longer boxes.

Boxes

I think we need a bigger box.
I had a 40% off coupon to Michael's so I went browsing. I stumbled upon a Large Photo and Craft Keeper by Iris, which is meant to hold 4x6 photos. With those dimensions it seemed like I could put two stacks of cards per box. Assuming each box holds 2 stacks of 60, that'd be about 120 cards x 16 boxes for 1920 cards. Though all Dominion sets [based on Wikipedia data] add up total 2850, it sounded like this would handle the 1450ish cards that I currently had.

I chose to take a cheap route to splitting each box in half, folding a regular envelope up to become a tray.

Doubles as a paper airplane.
I chose to mostly keep the supply cards bundled by set still (at least for Intrigue and the base set), though I may move away from this soon.

Tabs

Playing with tabs.
I liked the ease and cheapness in making tabs with index cards, so I chose to stick with that. This time around though, after a little bit of thought, I moved more toward vertical tabs. I liked the tabs from my first attempt a lot - I liked the readability and the color coding of each tab to make them easy to find, but with this effort I had two major hurdles to go though.

The first problem was how to get the tabs mixed in with the cards and be as readable as possible. Between looking through the plastic and looking all around the edge of the case to read the contents, I decided against large tabs and opted for little numbered tabs.

Sometimes easier is better.
I chose to stick with 6 numbered tabs, with identifying text for each tab on the front of the first tab of the set. I would've liked more, but it was pretty much at the box's capacity. I've been considering adding color to the tabs or the text up front, but I can't say it seems like much of a benefit at this point. While a nice indicator, the color of the Randomizer Cards don't seem to be as important as being organized alphabetically.

After a while I got lazy and only cut one side of the tabs off instead of both. I'm not sure if this approach is better, but it may hold up better over time. I'll have to see how it holds up over time.

The other good thing about not adding color is that I won't feel as bad if I get another set and have to readjust some or all of the tab sets. With the tab information all being on the first card, changing the ordering only requires replacing the (1) tab.

One card box containing 12 sets of Supply cards.

Result

Version 2: Less colorful right now, but more portable.
When I finished up, I had a box with a handle that contained all my cards easily. While it doesn't look like it'll hold all Dominion cards, I like how it's a compartmentalized solution; should I wish to take a subset of cards, I can mix and match easily, or just take the packs I need (if I organize them effectively).

Top Cards and Tabs roaming free in their boxes. ಠ_ಠ
There are still some little inconveniences though. Some of the tabs/cards slide around in the individual boxes, in spite of my efforts to prevent it from happening. I'll probably wait a little bit before considering how to correct this though, since I'm not sure if it's that big a problem. If it's only the top card or two, I'd rather they shift a little in transport than adjust the boxes so I lose more space.

Because I really don't want to confuse Randomizer Cards
with all the other cards.
Also there's a matter of labeling. Since there are now many little boxes I'd have to take them all out to see their contents. I'm considering stickers or tape labels to help with identification (I used painter's tape to label some things like the Randomizer Cards, but that was along the front). I'm also considering taping a guide/map on the inner part of the box for identifying the smaller boxes.
If only there was something on the top part of the box
to describe the bottom part of the box. Hmm.

Conclusion

So this is what I have at the moment. As you can read, there are a few more things to adjust, and my overall goal remains working toward an economical version of the kickstarter I initially saw. I think I'm getting closer, but there's still a way to go from here. If you have any suggestions feel free to let me know via the comments here, or wherever (Facebook, Twitter, Google+, email, etc.)

Tuesday, July 2, 2013

Small World Storage Solutions

Introduction

I had been meaning to try organizing my Small World game and two expansions, and finally had a little time this evening to give it a shot. When I originally bought Small World, I didn't know that after punching out the seven punch cards of tiles and money you put those cards underneath the box. This pushes the plastic shell up against the box cover to prevent pieces from shuffling around. Regardless of this little trick, Small World's packaging doesn't really accommodate for their expansions. I had Grand Dames of Small World and Small World: Curses! which added 5 more races and 7 special powers, so there was a breaking point.

Small World is a fun little game, but it has a lot of tiny pieces. [Google+]
In any case, since I've checked out the Container Store in the past for materials, and I didn't want to drive that far, I decided to try Michael's this time around. I found that they have some good materials that's I'll consider when I get to making a box for Dominion - I did get things for pulling small world together though.

I found they had some bead boxes that were almost the exact size of the race tiles. The yellow ones were divided into 10 compartments, and cost $1.99 each (!!!) so I got 2 of them. They were slightly short on the top, but I was able to work around it. I also got some jewelry boxes ($.80 each) for the larger race batches (lost tribes,  sorcerers, skeletons), since the bead boxes were so close in size, packing any tiles vertical wouldn't close the plastic containers. Other large tile batches than spread along two columns. I cut up the jewelry box padding to help prevent the tiles from shaking around too much, but cotton balls could do the trick too.

All races are front-facing, since vertical stacking prevents the
case from closing, and you at least see the imagery.

They had wooden boxes as well, so I got a nice thin flat one for about $6 to place these containers in. Sorry for the lack of links by the way, but Michael's website doesn't have all their products on it. I'm thinking in the future I'll probably ditch the plastic containers and add dividers to the wood box to allow additional races to be inside. The wood box is also pretty cheap looking, so painting it would be a good longer term goal as well.

The blue tape provides their names in clear lettering,
along with total tile counts.

I also got a few paper boxes (<$1 each) for storing the race tiles and game piece tiles like the mountains and troll lairs, since I wasn't really sure what to put them in otherwise.

After that I went to Staples and got some painter's tape ($6) and Sharpies for labeling. The 4-pack of black fine point Sharpies ($7) that I found will be good for this and other projects where the Rapidograph isn't bold or permanent enough. When I was in line though I noticed they had square acrylic containers that would contain the special power badges and other game pieces well. It was a back to school promo, and $5 for an 8-pack seemed like a decent price.

A while ago when I went to the Container Store, I got small cylindrical containers for the Small World coins, and I chose to continue using them for now. (I think they cost $3 for a pack of 8ish)

Containers, containers, containers.

Conclusion

So that's where I stand on this right now. Right now the only problem I have with the solution is that I had to resort to plastic bags for the race tiles, which is something I want to avoid. But considering that the boxes, containers and other things probably cost me about $20 in materials altogether, I think this is a pretty good start (and cheaper than the base game).

Small World box progress [Instagram]